Blog

cricut machine

Top 6 Amazing Cricut Projects for Creative Crafters

If you’ve recently purchased a new Cricut machine and want to make the most of your craft-cutting machine, there are multiple Cricut projects available for you. Below, we’ve gathered some fun Cricut ideas for the new year. Cricut is not just for fun; you can also utilize the Cricut machine and your crafting skills to grow a business. Check out our guide on how to monetize your skills.

  1. Light-Up Shadow Box

If you’re looking for an idea to recreate the soft glow of Christmas lights, shadow boxes are the perfect way to decorate your home and office. They are easy projects to create, so whether you’re new to Cricut projects or an experienced crafter, you’ll have fun making these boxes. These light-up shadow boxes with unique lighting effects can serve as beautiful and impressive gifts for your friends, family, and relatives. The vibrant colors of the lights against the dark background create a stunning visual display.

2.  Puzzle

Making gift cards and lighting tutorials can be great, but if you want to create something special for your loved ones, consider giving them a puzzle. A puzzle can be a unique and engaging gift that encourages the recipient to spend time-solving it. It provides a sense of relaxation and fun. Puzzles are not only perfect for children but also adults. To create puzzles, you can utilize the Cricut Maker or Explore 3 machine.

3.  Engrave Keychains

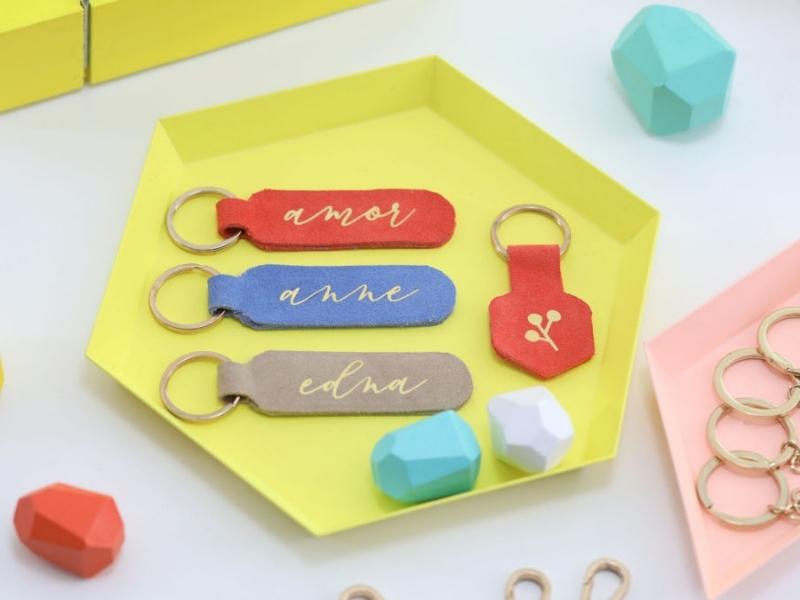
Gifting keychains has become popular as many people enjoy using them. To make personalized engraving and acrylic keychains with your Cricut Maker, investing in an engraving tool would be beneficial. Once you have the tool, you’ll have endless opportunities to enhance your projects by adding new details. Creating a Cricut project can be a fun and straightforward tutorial. Making an engraved keychain is easy and requires minimal effort. These keychains are unique and aesthetically pleasing, providing a positive vibe. They not only look cute but also help you keep your keys safe and easily find them.

4.  Print Designer T-shirt

Learn how to use a Cricut machine to sublimate designs onto a T-shirt. Nowadays, both children and adults are interested in customizing their T-shirts with attractive prints. The Cricut Maker offers a wide range of free images and texts that can be easily accessed, allowing you to give your T-shirt a unique style. You can even create your own designs to suit your personal style. Creating a sublimated T-shirt is a straightforward process. Simply select the desired design and text, and upload them to your Cricut projects.

5.  Watercolour Picture Frame

Working with the Cricut Maker 3 to create crafts can be a favorite activity for many people. When it comes to iron-on materials, there are various options available, but Foil Iron-on and Holographic Iron-on are among the most popular choices. These materials can add sparkle and shimmer to your projects, transforming your picture frames into eye-catching pieces. One particularly beautiful gift idea is the Watercolor Picture Frames, which can be easily made in just 30 minutes. While you can find frames at a craft store, using Basswood’s Knife Blade with your Cricut Maker 3 allows you to create custom frames with ease.

6.  DIY Home Decor

If it is possible to make home decor yourself, why purchase them? You can make many designs with 25 mind-blowing DIY projects to level up your home decor. Projects include a doormat, popcorn tin upcycle, and tumblers. The projects are condensed, but if there’s one you fancy. Multiple DIY home decors you can create by yourself.

Conclusion

There are countless types of Cricut projects that you can create to enhance your crafting skills. With the Cricut machine, you can effortlessly bring your creative ideas to life. Whether it’s crafting personalized cards, Mother’s Day watercolor picture frames, infusible ink shirts, or leather keychains, the Cricut machine makes crafting easy, enjoyable, and efficient. In this blog, we provide Cricut projects and inspiration for using Cricut to create wonderful and heartfelt gifts.

Get More Information :-

cricut.com setup mac

cricut machine setup

cricut com setup explore air 2

design.cricut.com/setup

Uncategorized

How to Set Up Your Cricut Maker or Cricut Explore Machine: A Step-by-Step Guide

Setting up your Cricut machine is an easy and straightforward process. With just a few steps, you’ll be up and running, ready to create unique and personalized projects. Here’s a step-by-step guide on how to set up your Cricut Maker or Cricut Explore machine.

Step 1: Unbox your Cricut Machine Unbox your Cricut machine and ensure that you have all the necessary components. You should have the machine, power cord, USB cable, and a cutting mat.

Step 2: Connect the Power Cord Connect the power cord to the back of the Cricut machine and then plug it into a power outlet.

Step 3: Connect the USB Cable Connect one end of the USB cable to your computer and the other end to your Cricut machine.

Step 4: Turn On Your Cricut Machine Press the power button on your Cricut machine to turn it on.

Step 5: Register Your Cricut Machine Follow the prompts on the screen to register your Cricut machine. You’ll need to provide some personal information, such as your name, email address, and a password.

Step 6: Install the Design Space Software Visit cricut.com/setup and download the Design Space software for your operating system. Follow the prompts to install the software on your computer.

Step 7: Connect Your Cricut Machine to Design Space Launch the Design Space software and follow the prompts to connect your Cricut machine to Design Space.

Step 8: Load the Cutting Mat Load the cutting mat into your Cricut machine. Ensure that the mat is aligned with the guides and that it’s firmly in place.

Step 9: Make Your First Cut Select a design from Design Space and follow the prompts to make your first cut. Ensure that the materials are loaded correctly, and then press the “Go” button on your Cricut machine.

Congratulations! You’ve successfully set up your Cricut machine and made your first cut. Now you’re ready to create a wide variety of unique and personalized projects.

visit my site :- cricut.com setup mac

cricut.com/setup

cricut.com/setup                   

home.cricut.com/create

cricut.com setup mac

Uncategorized

How to Calibrate Cricut Maker? [A Complete Guide]

Cricut Maker 3 is the new generation DIY cutting machine. It works with fast cutting and speed. It can cut many materials, including standard and Smart materials. However, to use the Print Then Cut feature, you must calibrate the Cricut Maker 3. Our blog is all about how to calibrate Cricut Maker. Rotary blades and knife blades are crucial to get the desired print. Whenever you are using a Cricut machine, maintenance is essential. Calibration is an important part of maintaining your Cricut machine before printing and cutting.

Why Calibrate the Cricut Machine?

You must calibrate your Cricut Maker machine for various reasons. The most important reason is that when you use a machine for the first time, it goes through specific processes such as movements and vibrations. Hence, you try the machine, like how it works and what problems you may face in the future. In short, it saves your time from future hassle. Especially in the Print Then Cut feature helps you to get the desired printed design.

When Does Cricut Need Calibration?

Usually, you know that your machine needs calibration when the cuts are dull and not as you expected. This is the most common case for many reasons. New users may get frustrated when their machine is not running well. They should understand that the problem is in the machine, which is 100% manageable with the calibration process. It should be done in a routine process to avoid hassle at work. For instance, calibration is a must before you print and cut.

These are some reasons why to calibrate:

  • When you have experimented with your machine with some hacks.
  • After using the Print Then Cut feature.
  • Regularly using the Cricut machine.
  • When you require loads of cutting for your work.

You will learn how to do this in the next section. But before that, you must know what the Print Then Cut feature is.

What is Print Then Cut in Cricut?

This is a feature of Design Space. With this feature, you can create or upload a design in the Design Space and print it on your printer. After that, place that print on the Cricut mat and into the Cricut machine. The machine will begin the cutting after sensing your print. You will get a precise cut without using scissors.

How to Calibrate Cricut Maker?

The process contains a few steps that need to be followed carefully.

Step 1

Launch your Design Space. Then, tap on the three bars at the top left corner of the screen. It will open up a menu. From the menu, select Calibrate, and three more options will appear. Now, choose your option, which is Print Then Cut. You can also choose the options for Rotary Blades or Knife Blades. However, we are emphasizing only the Print Then Cut option.

Step 2

In this step, print your calibration sheet using the software. Afterward, go with the steps and place the sheet on the mat and into your Cricut machine.

Step 3

After you follow all the steps described, the machine will prompt you to start your first test cut. During this process, ensure not to move the sheet or remove the Cricut Maker 3 mat, as you may have to start again. All four edges of the black square are untouched in this test cut. Hence, you need to select No and continue to proceed with the calibration.

Step 4

When you start again, the software will prompt you to answer whether the square touches all four sides. Select Yes if you find everything suitable, and the final step is done. If not, then the process will repeat once again.

After cutting, the software will ask you to examine the lines on the top and right of the calibration sheet. Then, you will have to answer which sides or top are closest to the center. After that, you need to use the drop-down box it offers you to add your answers. Now, follow all the instructions. The calibration will keep repeating until you are satisfied with your test cut.

Step 5

After getting a satisfactory test cut, the software will be convinced that the machine is running right. Then, the calibration window will shut. Now, you are free to start your projects. There are so many Cricut Maker 3 projects for beginners you can try. One bonus tip nobody will give you is that you can use sticker sheets if you don’t want to waste your sheets.

Conclusion

We have discussed the calibration process in your Cricut Maker machine. You also learned why and when to calibrate your Cricut machine. Usually, this feature is used as maintenance to keep the machine in good condition. Plus, a calibrated machine can help you with easy printing and cutting. There are three options by which you can calibrate your machine. Depending on your use and types of projects, you can choose your calibration process. Hence, whenever you have a problem with your Cricut machine, you know what to do.

Frequently Asked Questions (FAQs)

Do I Need a Calibration Paper?

Yes, the calibration paper is needed to give you an overview of the calibration process while you are performing that. This is specially designed to help the practitioners.

How is Calibration Helpful?

A calibration process helps you get precise cuts. It prevents you from the later hassles at work. Although machines come pre-calibrated, they may get dull with time and use. It also saves your money and provides complete safety to the machine.

How Often Should I Calibrate My Cricut Machine?

It depends on the use and the type of material you are using on your Cricut machine. Often, you can calibrate your machine quarterly, half-yearly or yearly.

Source :- How to Calibrate Cricut Maker?

Uncategorized

A Complete Setup Manual for Cricut Hat Press

Cricut Hat Press has a curved, ceramic-coated heat plate to create Iron-On, Infusible Ink & Sublimation projects. It has a versatile hat pressing form for a creaseless hat experience. Besides, it has customized heat settings up to 400*F (205*C) that can be controlled via smartphone.

In the box, you will find a hat-pressing form and a roll of heat-resistant tape. The machine will only work if it is connected to Cricut Hat App. The app will also get directions while creating a hat.

The insulated safety base offers a protected position while resting, and an auto-safety feature gets activated after 13 minutes of inactivity. Learn about the Cricut Hat Press, its setup process, tips, and tricks, followed by the FAQs.

What is the Cricut Hat Press Activation process?

In order to design customized hats from the Cricut Hat Press, it’s important to set up the machine; otherwise, you won’t be able to get the preferred hat design for attending any event. You can have a look at the following particulars via which you can complete the Hat Press machine setting up process:

  1. First, you need to open the bag and slowly remove the packaging of all the units.
  2. Second, Plug the machine into the wall socket and start the machine by pressing the Temperature button.
  3. Third, if the machine is opened for the first them, then the Temperature button will turn white in color.
  4. Further, the white color will show that the heat press has been set up.
  5. Open the respective app store and install the Heat Press app.
  6. After installing the app, you’ve to sign in to the app.
  7. However, if you’ve already signed in to Design Space, use its login details.
  8. Hat Press is one of the advanced models that uses Bluetooth technology to pair it with your smartphone and communicate with the app.
  9. You need to start the machine and put the device within 7 feet of distance so that it can reach its frequency.
  10. At the Heat Press app, press the Set Up button to set up.
  11. Afterward, you must choose the unit’s name and click the Connect button.
  12. You have to wait until the connection is complete.
  13. Read all the Private Policies along with the Terms & Conditions.
  14. Now, tick the Activate box.
  15. The app will share the status while it is activating with the machine.
  16. Following that, you’ll see a success notification with a ready-to-use heat press.
  17. Lastly, the machine will start heating up and be used with the app.

After setting up the machine, you must search for the ways via which you will understand how the machine works. Let’s have at the below section:

How to Operate Cricut Hat Press?

Follow the mentioned-below steps to study the stages revolving around which the Cricut Hat Press will prepare the customized shirt:

  1. First, create your design on the Design Space application.
  2. Second, you’ll receive a free hat design setup project for Cricut hat blanks.
  3. Third, if you are using a different brand, modify the size and adjustment.
  4. Afterward, the cutting procedure at the electronic cutting machine will get started.
  5. Further, weed the design along with folding the sweatband.
  6. Then place it on the pressing form and use the strong-heat-resistant tape on all sides of the design to attach the weeded design.
  7. Open the Heat Press app, change the settings, and follow the steps.
  8. Slowly move the heat plate back and front along with the design.
  9. The app will forward the settings to the machine, and the countdown will get started.
  10. The countdown will depend upon the material you are working on.
  11. Afterward, the competition of the process, the machine will start beeping.
  12. Wait until the material cools down, and slowly remove the heat-resistant tape and the liner to display your design.
  13. Lastly, through the app, you will be told when to remove the liner is a perfect time.

Other than that, if any situations arise where you are supposed to change the temperature settings, supervise the following section of the article.

How to Change the Hat Press Temperature?

If you want to change the Hat Press temperature while using it in designing the cap, then go through the sections explained below:

Change Temperature Manually

  1. Seal the Hat Press into a wall and switch on the power button.
  2. Tick the Temperature button after completing the setup process.
  3. Through this, you’ll get the appropriate heating setting.
  4. Select the Temperature box between low, medium, and high settings.

Change Temperature via Heat Press App

  1. First, press the power button after plugging the Cricut Hat Press into the wall.
  2. Second, open the app, select Cricut Heat Press & choose Start New Project.
  3. Tick on the Next after selecting the material and base material your want to apply.
  4. Further, after making all the decisions, tick on the Send Settings to Heat Press.
  5. Lastly, follow all the instructions shared on the screen.

After changing the temperature of your choice, you will get the desired hat from the Cricut Hat Press machine. In addition to that, you can also prepare your blank for the next project.

Conclusion

Summing up the blog, if you are a fan of adding new hats to your cupboard and want to customize them for various purposes, take Cricut Hat Press’s help.

Frequently Asked Questions (FAQs)

Question: What are the tips for using the Cricut Hat Press?

Answer: While using the Hat press machine, a user must remove the cupboard inserted insert of the hat before placing it on the form and trim the excess liner or paper close to the design where applicable to easily flex it over.

Question: Is it worth it to purchase the Hat Press?

Answer: This machine is a good choice if you are a crafter and love wearing different hats for various occasions. It easily connects with the smartphone Bluetooth and comes at an affordable price.

Question: What hats can be designed using the Cricut Hat Press?

Answer: Through the Hat Press machine, the user can create Dad’s Hat, Brooklyn Hat, Desert Sunset Hat, and many more.

 visit my site :-

design.cricut.com/setup

Cricut Explore setup

cricut.com setup mac

cricut.com/setup

Uncategorized

A Complete Guide to Cricut Maker 3 Instructions

Cricut Maker 3 is a versatile cutting machine that provides a wide range of cutting capabilities for all types of crafting projects. From paper to leather, this machine can cut through an extensive range of materials with accuracy and precision. Whether you are a beginner or an experienced crafter, Cricut Maker 3 can help you bring your creative ideas to life. In this guide, we will walk you through the instructions on how to use Cricut Maker 3 and make the most of its features.

Getting Started with Cricut Maker 3:

Step 1: Unboxing and Setting Up

The first step to using Cricut Maker 3 is unboxing the machine and setting it up. Start by unpacking the machine and its accessories, including the power cord, USB cable, and blade. Connect the power cord and USB cable to the machine and plug them into a power source and a compatible device. Make sure to follow the instructions in the user manual and ensure that the machine is connected correctly.

Step 2: Installing the Software

Next, you need to install the Design Space software, which is the primary software used for creating designs and controlling the machine. The software is available for free on the Cricut website. Download the software and follow the installation instructions to install it on your computer or mobile device.

Step 3: Connecting to the Machine

Once you have installed the software, you need to connect it to the machine. Turn on the Cricut Maker 3, and it will automatically connect to the Design Space software via Bluetooth. If the machine is not connecting, ensure that Bluetooth is enabled on your device.

Step 4: Choosing the Material

Cricut Maker 3 can cut through a wide range of materials, including fabric, paper, vinyl, leather, and more. Choose the material you want to work with and select it in the Design Space software. The software will automatically adjust the settings for the machine based on the material selected.

Step 5: Designing the Project

Now that you have chosen the material, it’s time to design your project. You can create your design from scratch using the Design Space software or choose from the thousands of pre-made designs available in the software’s library. The software allows you to customize the design, including the size, shape, and color.

Step 6: Cutting the Material

Once you have designed your project, it’s time to cut the material. Load the material onto the cutting mat and adjust the settings in the software to match the size and thickness of the material. Insert the cutting mat into the machine and press the start button in the software. The machine will then begin cutting the material according to the design.

Step 7: Removing the Material

Once the machine has finished cutting, remove the material from the cutting mat. Be careful not to damage the material, especially if it’s delicate or thin.

Step 8: Finishing the Project

Now that you have cut the material, you can finish the project by assembling the pieces or applying it to the desired surface. Follow the instructions in the design guide to complete the project.

Conclusion:

Cricut Maker 3 is a versatile and powerful cutting machine that can help you take your crafting projects to the next level. With its easy-to-use software and precise cutting capabilities, you can create professional-quality designs in no time. By following the instructions above, you can get started with Cricut Maker 3 and start bringing your creative ideas to life.

visit my site :- cricut.com setup mac

cricut.com setup mac

cricut explore 2 setup

Uncategorized

How to Create Cricut Valentine Cards?

People make an extra effort to express their emotions with someone special by making Valentine’s Cards with Cricut. According to their preference, they can easily give form, pattern, and texture to the card via an electric fabric dye-cut machine. With this machine’s help, an individual can make the necessary changes and finish the task before them.

You will be provided with many kinds of accessories while unboxing the machine. The accessories will save you time and money. If you’ve decided to share your feelings, this blog will help you in every possible way. Here you will be getting all the ideas that will help you create the best Cricut Valentine’s cards.

How Does Cricut Machine Help?

If intending to design a DIY Valentine’s card, all the crafters need to have basic information about what Cricut Machine is. In simple language, the Cricut machine can be defined as an electronic device that automatically cuts different kinds of fabric into the demanded form.

The machine holds the ability to cut materials from wood to paper swiftly. The blades inserted inside the machine make it possible by giving the user a personalized design. Besides that, the Design Space gives the users access to draw their idea/creations or download images on their devices.

Do You Need Cricut Card Mat?

Cricut Card Mat is a 4-in-1 reusable cutting mat used to create last-minute birthday cards soon. This card cutting mat is specially designed to simplify the card design process. Through this mat, the crafting process of creating DIY projects becomes fun and easy. The tools and accessories help the designer in utilizing their artistic skills.

Which Cricut Machine Can Help You Prepare It?

The Explore, Maker series and Joy of this material cut-dye machine are the best alternatives to design card projects for various events. Along with the machine, you’ll also get the essential accessories and Cricut Mat 2×2. With the machine’s help and other supplements, the respective mat will make the best-looking card within a few minutes. This mat can craft up to four pro-cards in a single time by taking the help of various equipment.

What are the Items Needed While Making Cards?

To design a personalized Valentine’s card, all crafters must have the following items before starting the process. The names of the essential items can be collected from the pointers shared below:

  • Cricut Joy, Explore, or Maker series.
  • Design Space app on PC or mobile.
  • Joy version blade & housing, cutaway cards+ backers, card mat, pen/markers, and foil transfer tool.
  • Weeder tool/ Scraper tool (if required).

How to Create Cricut Valentine Card?

Follow the steps to learn about the steps via which you can create your Valentine’s Day card from the app:

  • Open the Design Space app on your system.
  • Design your card by using images, text, or font as you wish.
  • When your design is complete, hide or delete any size guiding layers.
  • Select the elements, and tick on the ‘Attach’ option.
  • You’ll see that your design will get previewed on the mat.
  • Press the option with ‘Make It.’
  • Click on the ‘On Card Mat’ inside the ‘Continue’ Dropbox.
  • Choose ‘Browse All Materials.’
  • Then tick on the ‘Cutaway card+Backer.’
  • Spread the adhesive as per the requirement.
  • Slowly press the front of the card into the card mat.
  • Put the mat inside the machine and wait for the process to complete.
  • After the process will get complete, peel off the mat from the card.
  • Use your fingers to remove the extra pieces to avoid any scratches.

Conclusion

Designing customized Valentine’s cards can be much more fun and easier with the Cricut Machine. Through the machine, you’ll get thousands of images, fonts, and pre-folded mats to help you design last-minute cards.

Frequently Asked Questions

Question: How many types of cards will be provided in the machine?

Answer: Three types of cards will be provided with the machines: Cricut Insert Cards, Cutaway Cards & Foil-Transfer Insert Cards.

Question: In how many sizes are Cutaway cards available?

Answer: The cutaways cards are available in five sizes which are: R10: 3.5 in x 4.9 in (8.9 cm x 12.4 cm), R20: 4.25 in x 5.5 in (10.8 cm x 14 cm), R40: 4.75 in x 6.6 in (12.1 cm x 16.8 cm) and S40:  4.75 in x 4.75 in (12.1 cm x 12.1 cm).

Question: Will I get to write inside the card while using the mats?

Answer: Yes, you can write your message inside the card by folding it inside out and putting it inside the mat.

visit my site :-

Cricut Explore setup

cricut design space app

design.cricut.com/setup

design.cricut.com/setup

Cricut Explore setup

Cricut Explore setup

Uncategorized

Cricut Access Subscription

Is a Cricut Access subscription worth it? Simply put, it is the right choice to buy a subscription. The subscription plan lets the users download images, fonts, stickers, and pre-designed projects in the Design Space. Besides, one can also become a member by purchasing the Membership plan.

The subscriber will get various offers and discounts while crafting any creation on the app. We’ve explained all topics that will assist you in grabbing details related to subscription plans and many more.

What is Cricut Access?

You must know the Cricut machine and its Access subscription plan if you are a crafter. Through the plan, you can swiftly enter the library filled with non-licensed images, fonts, and in-hand projects through the plan. The subscription is issued to enjoy all the items inside the library. The users will also get various plans for Cricut subscriptions.

What Do You Get With Cricut Subscription?

Before investing money to purchase the subscription plan, you must learn about its common benefits. The following pointers will help you decide whether you are supposed to buy the plan or not. To ensure the plan, you need to study all the points thoroughly:

  • You’ll get a $10 coupon for every coupon, including free shipping and a 10% off.
  • To enjoy the discount, you must enter the SPRING10 code.
  • There are more than 700+ fonts that will make your design look professional after the completion of the cutting and designing process.
  • You’ll get around 3 lakh+ images inside the library and 100+ personalized projects for every motive and occasion.
  • Experience automatic background remover and different kinds of plans for pans for the member.
  • You can enjoy the benefit of this subscription after signing in to the Cricut account.

How Many Plans Does Cricut Access Offer?

With Cricut Access, you’ll get three subscription plans, i.e., Free, Standard, and Annual. It will be your decision about which plan to buy to claim its respective benefits:

Free Plan

  • There are 3,00,000+ images, 15+ fonts, and limited digital purchase choices.
  • 250+ completed projects and up to 5 collections.
  • It is included in the Cricut account.

Standard Plan

  • Unlimitable use of 30,000+ pictures, 700+ fonts, and 1,000 pre-designed projects.
  • 10% off on authorized images and limitless collections.

Premium Plan

  • Uncountable usage of more than 3 lakhs images, availability of more than 700 types of fonts, along with 1000 ready-to-use creations.
  • 10% off on the machine purchased from the official website and 20% off on the machines.
  • Free economy shipping on $50+ orders and prioritize member care.

How to Buy Cricut Access Plans?

Interested users can buy their monthly or yearly subscription from the Design Space or Cricut Joy version. While purchasing the plans, you need to ensure the system is updated.

Windows/Mac (For Monthly & Yearly plans)

  • Open the Design Space or Joy app.
  • Search for ‘Cricut Access & tap on the ‘Subscribe’ button.
  • Choose the plan which you want to take (Monthly or Yearly).
  • Then press on the ‘Add This Plan’ box.
  • Submit your payment particulars and click on ‘Confirm.’
  • If required, fill out the password to allow the payment.
  • Once the payment is made, your plan will instantly get activated.

Android/iOS (Monthly or Yearly plans)

  • Start the process by signing in to the Cricut app.
  • Now, choose ‘Cricut Access’ and tap the ‘Sign Me Up’ option.
  • Now proceed via an iTunes account.
  • The order summary will get visible in front of you.
  • For the next step, click the ‘Confirm’ button and enter your Apple Id.
  • To complete the purchase procedure, tick on the ‘Sign In.’
  • You must wait until the payment process gets complete.
  • Your subscription plan will immediately get started.

After learning how to purchase the Cricut subscription, you can unsubscribe if you face any issues while using the plan. Below we’ve shared the steps to unsubscribe from the plan.

How Can I Unsubscribe from Cricut Access?

If you want to unsubscribe yourself from the plan, you need to follow the steps given below:

  • Open the Cricut official website.
  • To get connected with your account, enter the credential.
  • Now, press the ‘Sign In.’
  • The ‘Subscription’ will be available on the left side of the My Account page.
  • On the subscription page, the ‘Cancel’ button will be available.
  • Select the ‘Yes’ box for unsubscribing to the plan.
  • You will get unsubscribed from the account and won’t get the benefits of the plans.

Conclusion

Various kinds of Cricut subscription monthly & yearly plans come with Cricut Access. Through the subscription, you’ll get different offers under what you’ve purchased. Besides, you also unsubscribe yourself from the plan.

FAQs

Question No. 1: What is the cost of a Cricut subscription?

Answer: The Cricut Access can be purchased from the Design Space app for Mobile. Cricut reopens its monthly subscription from $9.99 to a yearly subscription from $95.88 (excluding all taxes).

Question No. 2: How to get a Cricut subscription for free?

Answer: To get a free subscription, log in to your respective account. Then press the ‘Cricut Access’ and follow the instructions. You will get a free subscription for a limited time.

Question No. 3: Can a person located outside the U.S. allow to use Cricut Access?

Answer: Presently, U.S., Canada, U.K., Germany, France, and Ireland citizens can buy the subscription from the official website or the Design Space app. You can use the subscription for PC & Mobile as well. However, residents of Australia and Europe can subscribe to the plan via the Cricut app.


Visit my site :-

cricut explorer 2 setup

cricut-mug-press setup

cricut easypress 2 setup

design.cricut.com/setup

Cricut Explore setup

Uncategorized

How to Setup a Cricut Maker 3 on a Computer

Setting up a Cricut Maker 3 on a computer is easy and straightforward. By following these simple steps, you can set up your Cricut Maker 3 in no time.

Step 1: Unpack Your Cricut Maker 3 Unpack your Cricut Maker 3 from the box and ensure that all the contents are intact. You should have a power cord, USB cable, and the Cricut Maker 3 machine itself.

Step 2: Connect the Power Cord Connect the power cord to the back of the Cricut Maker 3 machine and plug it into a power outlet.

Step 3: Connect the USB Cable Connect the USB cable to your computer and the Cricut Maker 3 machine.

Step 4: Turn on Your Cricut Maker 3 Press the power button on your Cricut Maker 3 to turn it on.

Step 5: Download and Install Cricut Design Space Visit the official Cricut website at cricut.com/setup and download the Cricut Design Space app. Follow the instructions on the screen to install the app on your computer.

Step 6: Connect Your Cricut Maker 3 to Cricut Design Space Open the Cricut Design Space app on your computer and log in to your account. Connect your Cricut Maker 3 to the app by selecting “New Machine Setup” in the app and following the on-screen instructions.

Step 7: Calibrate Your Cricut Maker 3 Calibrate your Cricut Maker 3 by selecting “Calibration” in the app and following the on-screen instructions.

Step 8: Start Crafting Once you have successfully set up your Cricut Maker 3, you are ready to start crafting. Begin by selecting a project in the Cricut Design Space app and following the instructions.

In conclusion, setting up a Cricut Maker 3 on a computer is easy and quick. By following these simple steps, you can enjoy your new Cricut Maker 3 machine in no time. With its powerful features, you can create a wide range of crafts and designs with ease. Happy crafting!

visit site :- cricut.com setup mac

cricut.com/setup